Posts

Showing posts from April, 2019

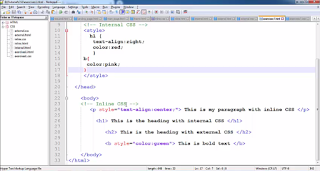
CSS - Position in CSS

Image
In this video,I explained the  Position in CSS . Feel free to comment. For more, please subscribe and press the BELL icon. Please visit my  CSS Playlist . Please link, comment, share and subscribe. The code is as follows - HTML File -  <html>    <head> <title> CSS Position </title>      <link rel="stylesheet" href="position.css">    </head>   <body>  <p> Adding CSS Position to this paragraph </p>   <h3> Hi </h3>   <h4> Hi... H4 tag </h4> <br> <br>   <h2> H2 Tag </h2> </body> </html> CSS File -  p { position: static; border: 5px dotted green; color:red; } h3 { border: 2px solid yellow; position: relative; } h4 { position: absolute; border: 3px dashed blue; right: 50px; } h2 { position: fixed; border: 2px solid red; left: 40px; }

CSS - Float in CSS

Image
In this video,I explained the Float in CSS . Feel free to comment. For more, please subscribe and press the BELL icon. Please visit my  CSS Playlist . Please link, comment, share and subscribe. The code is as follows - HTML File -  <html>   <head> <title> CSS Float </title>     <link rel="stylesheet" href="float.css">   </head>     <body>     <h3> this is heading using h3 tag </h3>     <img src="banner.png" alt="A Image">   </body> </html> CSS File -  img { height: 350px; width: 350px; float: right; border: 20px solid green; margin: 10px; padding: 15px; } h3 { float:right; }

CSS - Margin in CSS

Image
Hope this post finds you well. In this video,I explained the  Margin in CSS. Feel free to comment. For more, please subscribe and press the BELL icon. Please visit my  CSS Playlist . Please link, comment, share and subscribe. The code is as follows - HTML File -  <html>   <head>      <title> CSS Margin </title>    <link rel="stylesheet" href="margin.css">    </head> <body>   <h4> Hi.. Guys Welcome To My Channel </h4>   <b> Hi.. Please visit my blog - webguruanik.blogspot.com </b>     <h1> Hi </h1> </body> </html> CSS File -  h4 { border: 1px solid blue; margin: 50px; padding: 12px; } b { border: 2px dotted green; margin: 10px; padding: 20px; } h1 { border: 2px dashed red; margin: 35px; padding:30px; }

CSS - Padding in CSS

Image
Hope this post finds you well. In this video,I explained Padding in CSS . Feel free to comment. For more, please subscribe and press the BELL icon.  Please visit my  CSS Playlist . Please link, comment, share and subscribe. The code is as follows - HTML File -  <html>   <head>     <title> CSS Padding </title> <link rel="stylesheet" href="padding.css">   </head> <body>   <p> This is my paragraph </p>   <h1> Hi </h1>     <h3> H3 </h3> </body> </html> CSS File -  p { border: 1px solid blue; padding: 20px; } h1 { border: 2px dotted green; padding: 50px; } h3 { border: 2px dashed red; padding: 5px; }

CSS - Border in CSS

Image
Hope this post finds you well. In this video,I explained the  Border in CSS. Feel free to comment. For more, please subscribe and press the BELL icon. Please visit my  CSS Playlist . Please link, comment, share and subscribe. The code is as follows - HTML File -  <html>   <head>      <title> CSS Border </title>    <link rel="stylesheet" href="border.css">     </head>     <body>     <p> This is paragraph </p>     <h1>  This is my first heading </h1>       <h3> I am using h3 tag </h3> <h2> I am using h2 tag </h2> <h4> I am using h4 tag </h4> <h5> I am using h5 tag </h5> <h6> I am using h6 tag </h6>   </body> </html> CSS File -  p { border: 5px solid green; } h1 { border: 12px dotted red; } h3 { border: 7px dashed green; } h2 { border: 9px double blue; } h4 { border: 15px

CSS - Font in CSS

Image
In this video,I explained Font in CSS . Feel free to comment. For more, please subscribe and press the BELL icon. Please visit my  CSS Playlist . Please like, comment, share and subscribe. The code is as follows - HTML File -  <html>   <head>     <title> CSS Fonts </title> <link rel="stylesheet" href="cssfont.css">   </head> <body>   <h1> This is my first heading </h1>     <h3> This is my second heading </h3>   <u> This text will have underline </u> </body> </html> CSS File -  h1 {   color: green;   font-size: 100px;   font-family: Arial; } h3 { color:gray; font-family: Arial Black; } u { font-size:25px; color: red; }

CSS - Specific Selector in CSS

Image
In this video,I explained the Specific Selector in CSS . Feel free to comment. For more, please subscribe and press the BELL icon. Please visit my  CSS Playlist  . Please link, comment, share and subscribe. The code is as follows - HTML File -  <html>   <head>     <title> Specific Selector </title> <link rel="stylesheet" href="specific.css"> <style> p.center {    text-align: center; } i#id {    color:red; } </style>   </head>     <body>      <h1 class="center"> This is the H1 tag </h1> <p class="center"> This is the Paragraph tag </p>     <b id="id"> This is the bold text </b> <i id="id"> This is the italic text </i>     </body> </html> CSS File -  p.center {   color: green; } i#id { font-size:25px; }

CSS - Universal Selector in CSS

Image
In this video, I explained Universal Selector in CSS . Feel free to comment. For more, please subscribe and press the BELL icon. Please visit the YouTube CSS Playlist . Please link, comment, share and subscribe. The code is as follows - HTML File -  <html>   <head>      <title> Universal Selector </title> <!-- Universal Selector --> <link rel="stylesheet" href="universal.css">        <style>      * {    font-size: 25px; }      </style> </head>   <body>      <p> This is the paragraph tag </p> <h1> This is the heading tag </h1> <b> This is bold tag </b> <i> Hi everyone </i> <h4> My blog- webguruanik.blogspot.com </h4>   </body>    </html> CSS File -  * {   text-align: center;   color:red; }

CSS - Grouping Selector in CSS

Image
In this video, I explained Grouping Selector in CSS . Feel free to comment. For more, please subscribe and press the BELL icon. Please visit my  CSS Playlist . The code is as follows - HTML File -  <html>   <head>      <title> Grouping Selector </title> <!--  Grouping Selector --> <link rel="stylesheet" href="grouping_selector.css"> <style>    h1 , p {      color:green;    } </style>   </head>     <body>      <h1>  This is the tag of h1 </h1> <p> This is the paragraph tag </p> <b> This is the bold </b> <i> This is the italics tag </i>       </body>     </html> CSS File -  h1, p {   text-align: center; } b, i { color: red; }

CSS - Element Selector in CSS

Image
In this video, I explained the  element selector in CSS. Feel free to comment. For more, please subscribe and press the BELL icon. Please visit the  YouTube Playlist . Please Link, Comment, Share and Subscribe. HTML FILE -  <html>   <head> <title>  Element Selector in CSS </title>   <link rel="stylesheet" href="element_selector.css">     <!-- Element in CSS - HTML Tags -->   <!-- Element Selector -->    <style>    p {      text-align:center; color: green;      }    </style>   </head>   <body>   <p> This is my paragraph </p>     <b> This is the text in bold </b>       </body>     </html> CSS FILE -  b {  color: red; }

CSS - ID Selector in CSS

Image
Hope this post finds you well. In this video, I explained the  ID Selector in CSS. The code is shared in My Blog . Feel free to comment. For more, please subscribe my channel and press the BELL icon. Please visit my  CSS Playlist . The code is as follows - id_selector.html -  <html>   <head>      <title> ID Selector </title> <!-- External CSS --> <link rel="stylesheet" href="id_seclector.css"> <!-- Internal CSS --> <style> #head4 {     color:yellow; } </style>   </head>     <body>   <!-- ID selector -  id attribute -->   <!--  # symbol -->     <h4 id="head4"> This is the heading tag uses h4 tag </h4> <h5 id="head5">  This is the heading tag uses h5 tag </h5>       </body>   </html> id_selector.css -  #head5 {    color:red; }

CSS - Class Selector in CSS

Image
In this video, I explained the  Class Selector in CSS. Its code has been uploaded in my blog - Web Guru Anik . Feel free to comment. For more, please subscribe my channel and press the BELL icon. For more, please visit my  CSS Playlist . Please link, comment, share and subscribe. The code is as follows:- class selector.html -  <html>   <head>      <title> CLASS Selector </title> <link rel="stylesheet" href="class_selector.css"> <!-- Internal  CSS--> <style>     .para1 {    background-color: yellow;    text-align: center;    color: green; } </style>    </head>      <body>    <!-- Class selector - use any class     class attribute-->    <!-- Class selector - dot (.) symbol -->       <p class="para1"> This is my paragraph in body tag </p>   <h1 class="head1"> This is my paragraph </h1>    </body> </h

CSS - Exercises 1 - Inline, Internal and External CSS

Image
In this video, I explained all types of CSS -  Inline, Internal and External CSS . Feel free to comment. For more, please subscribe my channel and press the BELL icon. For more, please visit my  CSS Playlist . Please link, comment, share and subscribe. The code :- exercises1.html - <!-- inline, internal and external CSS --> <html>   <head>      <title> Exercise 1 </title> <!-- External CSS --> <link rel="stylesheet" href="exercises1.css"> <!-- Internal CSS --> <style>    h1 {     text-align:right; color:red;     } b{   color:pink; } </style>   </head> <body> <!-- Inline CSS -->        <p style="text-align:center;"> This is my paragraph with inline CSS </p>            <h1> This is the heading with internal CSS </h1>             <h2> This is the heading with external CSS </h2> <